
Last Updated on November 25, 2025
- What is Usertesting and What do I do over there?
- How to Signup and start working on Usertesting.com?
- Passing the Qualification test (and importance of your first paid test)
- Becoming a 5-star rater and boosting your earnings
- how to qualify for more screeners in usertesting (and maximize your earnings)?
- how much can i earn through usertesting?
- final thoughts on usertesting
What is Usertesting and What do I do over there?
TLDR;
💻 A website that pays you to test website and apps.
⌚ Tests take 10-15 minutes and pay 10$
💰 You can easily earn 100-150$ monthly.
Any special equipment I need?
Nah, just a laptop (and Internet). 💻
Having a Headset is a plus. 🎧
The ability to speak out your thoughts is essential. 💭
Do you know that the upsurge in the usage of apps, and the increased focus on the UX of these websites and apps have unlocked a whole different way of making some quick bucks on the internet? Some companies take the design and UX of their websites/apps so seriously that they offer small “testing” groups to use their services, and discuss their functionality and experience with them.
These types of websites are broadly categorized as user-testing websites. They pay you to submit a screencast of you performing several tasks on either a desktop or a mobile device (depends on the tasks), and you get paid pretty handsomely for that.
Their are several of these websites, but out of the 5 that I tried, I have so far found work on only this one platform and was even paid by them. I was surprised as to how quickly they paid me after I had submitted my work. I was paid around 3 days after I submitted my first assignment, even before they were finished reviewing it.
How to Signup and start working on Usertesting.com?
TLDR;
📃Signing up is simple. Just click here and follow the steps.
🧪 You will need to pass a qualification test.
📖Read this article to know more about the Usertesting Signup process.
How to Pass the Qualification Test
There are some common reasons why a lot of people fail. Avoid them and you are in. 🤗
Start Usertesting and let the money roll in. 🤑
Here is a step-by-step guide to creating an account on usertesting.com and some helpful tips along the process:
step 1: sign up to become a tester.
Go to their “Become a tester” page. You will be greeted by a text box asking you to enter your email address.
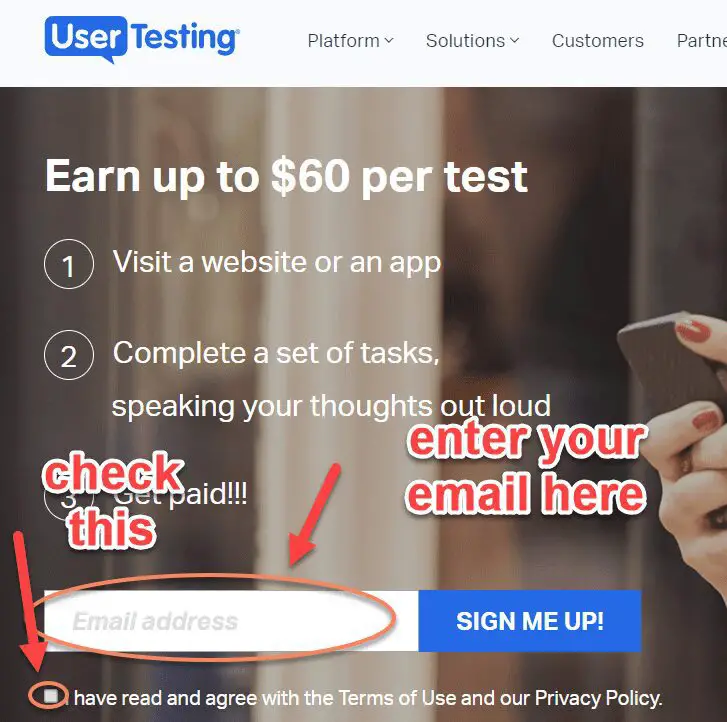
Now check your email inbox (the one you signed up with), it will contain a link to complete your application.
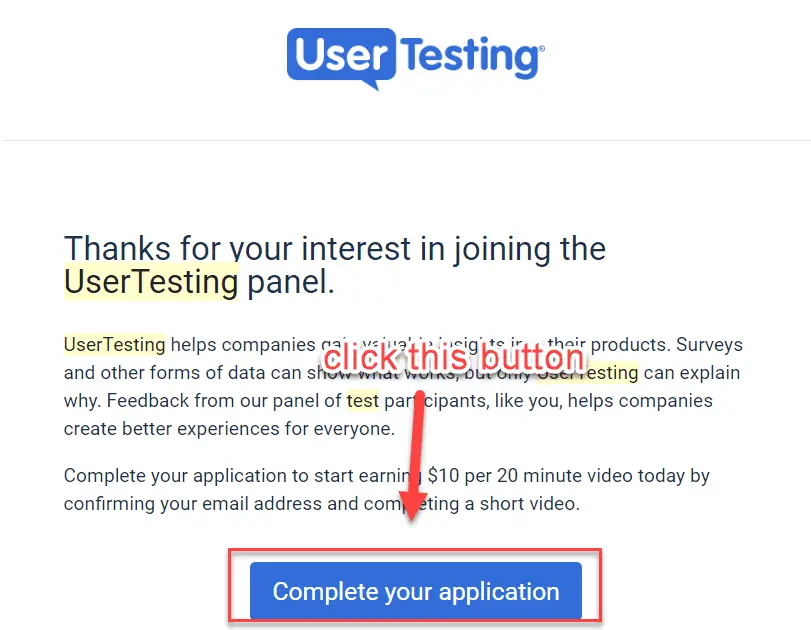
Upon clicking the above button, you will be taken to their tester signup process. Here is what it looks like.
step 2: completing your application
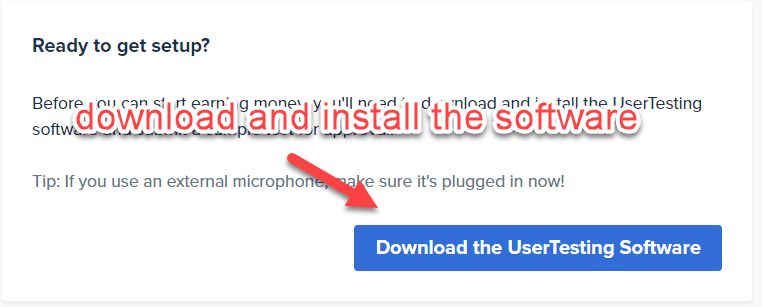
After clicking the link in the email, you will be taken to their signup page. You will first be greeted by a page that explains how to become a good user tester. I strongly recommend you to watch the video to understand what they will be expecting of you.
Then, you will be asked to download the usertesting software. Note that it is a screen recording software, that will be activated whenever you are giving a test. This software helps them to seamlessly record and upload your tests, even if their are interruptions in one form or the other (such as a flaky internet connection).
step 3: give their qualification/sample test for approval
Before you start sweating, don’t worry. It’s a very simple test, where you just need to browse a website and speak your thoughts out loud regarding the tasks given to you. They just want to test whether you understand the concept of user testing, and how you can be beneficial to the client.
You can also check out my article on the common mistakes people make in the usertesting qualification test, and how to fix them.
Infact, in my experience I don’t think anyone would get rejected in this. It’s a pretty simple and straightforward test and doesn’t take more than 10 minutes.
step 4: wait for approval
Once you have submitted the test, your application will be put under review and will be checked by their team. You will receive an email like this:
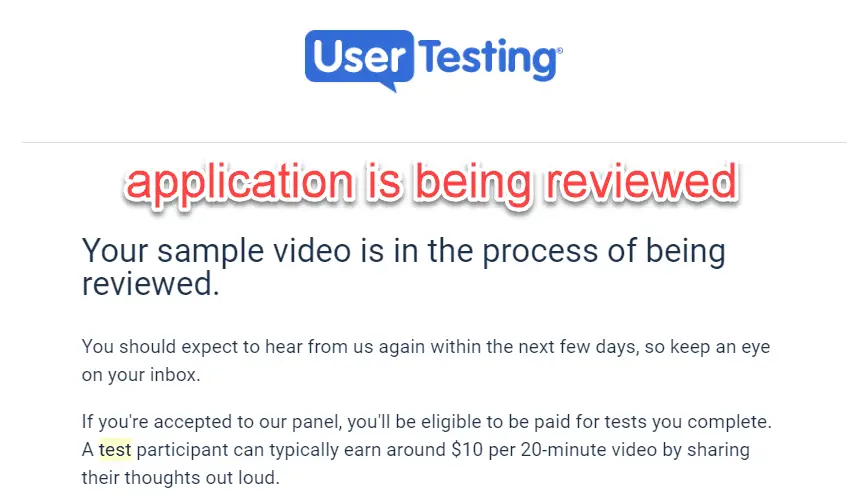
And after some wait, hopefully, they will approve your application. In my case, I received a reply from them on the next day itself.
step 5: start qualifying for screeners
After getting approved, usertesting is just like any other site you must have used. Still, here are some tips on what to do next:
- Create your account. Set up your email, paypal payment address and password.
- Complete your profile. Add the devices you own, your social network profiles, etc. These help in getting you more tests.
- Take the lessons. If you have some doubts, you can visit their Help Center, accessible from your dashboard.
- Start taking tests. Log in to your dashboard and start taking tests. If you don’t see any tests, then wait for a “ding” sound, that comes whenever a new test is available.
Tests come and go on a first-come, first-serve basis. And there are several things I would like to tell you about it. I will write a different article altogether for using usertesting.com. Also remember, Testing isn’t a get-rich-quick scheme, but you can easily make some cash on the side. Happy testing.
Passing the Qualification test (and importance of your first paid test)
I have received a lot of feedback from people saying they were unable to pass the qualification test, even though I personally feel that the test is pretty simple and straightforward. There are two common reasons I noticed why people fail their sample test:
tip 1: check if your mic is working and recording properly
This is the #1 reason why people fail their tests. Almost 80% of the people that told me they failed their Usertesting qualification stated issues in audio as the reason for rejection. I believe it is a common issue as people are not accustomed to using the microphone on their laptops, and they don’t know if it even works properly.
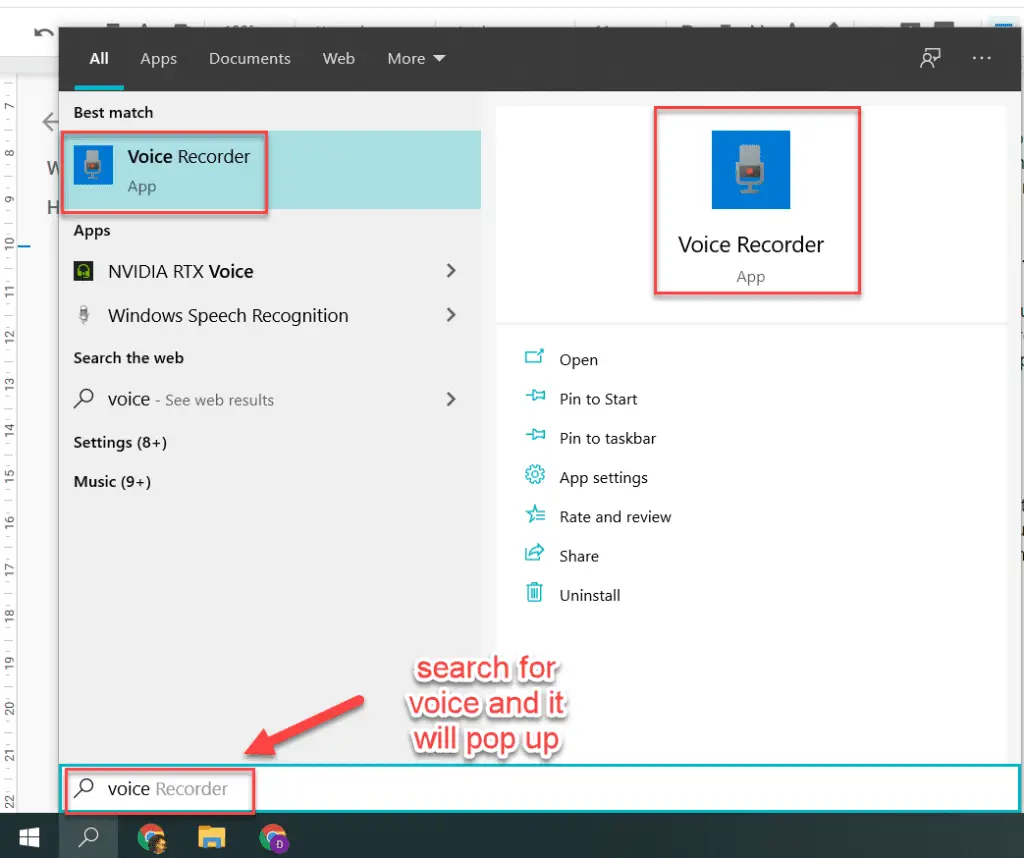
To troubleshoot this problem, we first need to do a soundcheck. Open the Voice Recorder app on your laptop.
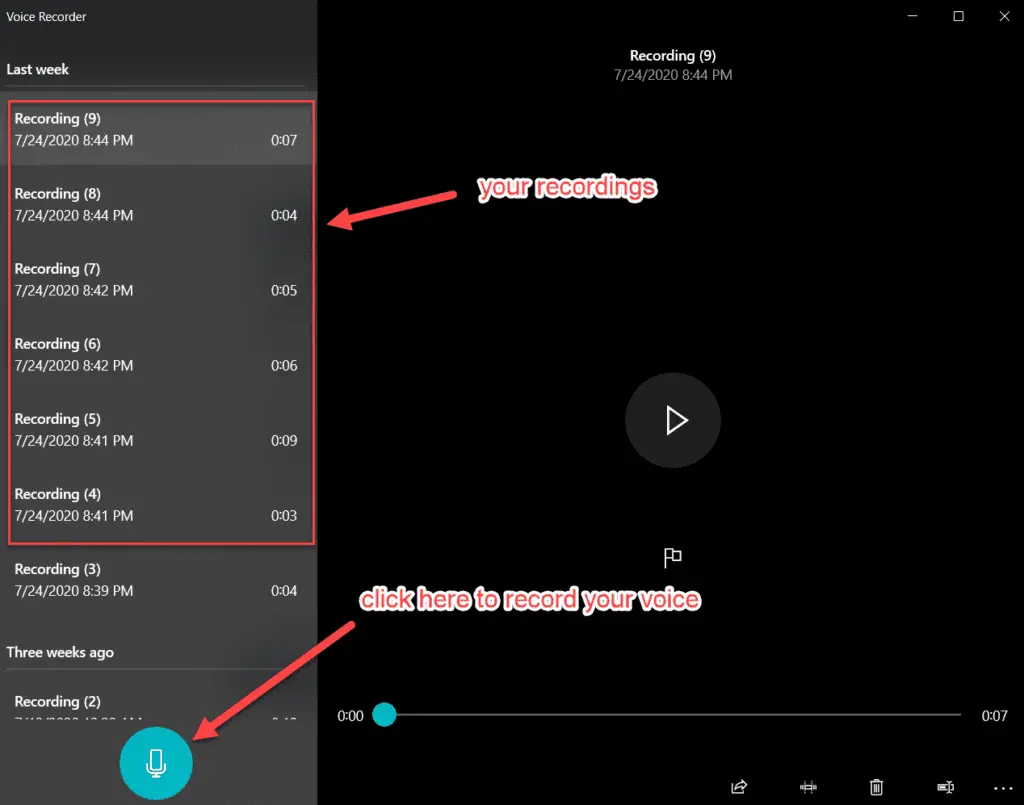
Once you have opened the app, record yourself saying something.
- Try recording your voice for 5 seconds, and play it back.
- Record some more, bring variation by speaking at different distances from your laptop.
- Also, try to speak at different levels of loudness.
Now playback the recordings. You might cringe a little listening to your own voice (it happens to everyone), but it will give you an idea of how the microphone is picking up your voice. For example, you can better understand where you need to speak from for the best possible input. This is because laptops have different placement of the in-built microphones.
In case you are unable to hear yourself in any of the recordings, there is some serious problem with your mic. It could be due to two reasons: Either your mic is broken, or you have some problem with your microphone settings.
Fix 1: Check your Microphone Settings and Drivers
Fix: If it’s the wrong settings that are causing this issue, you can check out this article (specific to Windows 10) or just search google for “Microphone troubleshooting <your device/manufacturer name>”
If your microphone is broken, I suggest you get an external microphone online. There are 2 types of microphones you can buy online: Digital Mics and Condenser Mics. Digital mics are the cheaper option and get the job done, but if you want to take your voice recording to the next level, get yourself a condenser mic. I will discuss more about them later.
Another thing to note in your recordings is whether the voice is loud and clear. Sometimes, the voice cuts off in-between very abruptly, which might be caused due to several factors. But if it is happening, do try to note whether changing your speaking position fixes it (sometimes the voice is cut abruptly as part of the noise cancellation mechanism).
Fix 2: Get a New Microphone, or use your Mobile as a Mic
Fix: It is more difficult to fix, as there are a different number of reasons that can cause this. It might be an issue with your software drivers, or it could even be your hardware.
The best bet here is to check Google for answers specific to your device. You can also try the mobile app I mentioned earlier to use as an external mic, and see if the problem still persists. If the issue is solved, you can use your smartphone instead of your laptop’s in-built mic.
Fix 3: Use AI-based Noise Reduction Tool
The last issue that we are looking for is background noise. It is caused by the appliances in your environment, such as refrigerator, fans, A/C. Check if the mic is picking up a lot of background noise. If your voice can over-power the background buzzing/humming sound, then it is OK. But sometimes there is a static sound due to these devices, which interferes with your voice and degrades the quality of your recording.
If you face this issue, try moving to a quieter environment, or switch off the fan or other devices for the duration of the recording.
Increasing your voice quality helps you converse with clarity. Try Krisp, an AI-based noise reduction tool that will get you studio-quality voice recording from your regular microphones. It’s free!CLICK HERE TO DOWNLOAD KRISP FOR YOUR PC/MAC
You need to understand that your voice is the main medium of communication in these tests, and you are being paid for your thoughts and opinion. Without a clear and loud voice recording, the reviewer on the other end would not be able to judge your work. So make sure you get the basics clear.
tip 2: try speaking more, vocalize each one of your thoughts
If you fail due to this reason, then it is more of a problem with your understanding of the tasks rather than a technical glitch.
The sample test consists of tasks. But just finishing the tasks successfully does not qualify you as a tester. The actual test is about how you verbally dictate your thought process while doing the required tasks.
The main aim of the tests that you take in Usertesting is to understand the psyche of the end-user while he/she performs the said tasks. This helps the UX designers get detailed insights on how they can improve the design of the website/app in a way to make it simpler to the user.
Say the task requires you to find the opening time of a particular museum. This does not mean you just navigate to the required information and it is finished. You actually need to speak out your thoughts as often as possible, such as “I think the museum’s information page might contain the timing information”, “Maybe the sidebar contains a link that can tell us about the opening time of the museum”.
Not only this, they are looking for as much feedback as you can give regarding your experience with using the site/app, so don’t shy away from speaking anything, such as:
“Maybe if that button was a different color, such as green, it would be much more appealing to me.”
“I think if that link was a little more highlighted, it might be easier to navigate to it.”
“The animations on the site make it really enjoyable to interact with”
“I would like it if the text here was more concise and simpler”
And so on. You get the idea.
Remember, the more you communicate and speak out your thoughts, the more you help the researchers. Speak out even if you think it is silly or irrelevant. Your unique insights can help the researchers in various ways.
It’s not the tasks that you need to complete, it’s speaking what’s on your mind while doing them that’s the actual task. Your thoughts are what will help the User Experience designers gain valuable insights on their products, and understand how users will interact with them. Remember there is no right or wrong way to do anything, there is no correct or incorrect answer. It’s just about your genuine opinion.
And this is exactly what makes Usertesting (and other similar sites) so interesting. You are getting paid for your opinion, and nothing else.
Read more about passing the Usertesting sample test in this detailed article.
Becoming a 5-star rater and boosting your earnings
TLDR;
becoming a 5-star tester
⭐Your first paid test is very crucial. You will be assigned a star rating by Usertesting.
🎉5-star raters receive more tests.
💡Follow these tips to get a 5-star rating.
increase your earnings
⏳ UserTests are first-come, first-serve.
✌ The more tests you attempt, the more you can earn.
💁♂️ Here are some tips to increase your earnings.
To become a 5-star tester in Usertesting, you need to take care of 2 areas:
Audio Quality and Your Inputs (ie, what you speak)
Before we dive into these topics in detail. First, let’s clear out why you need to become a 5-star tester. It’s simple, Becoming a 5-star tester means you get invited for more tests, which in turn increases your earnings.
Make your audio recordings high-quality and noise-free using special software
Your voice is the only thing that the reviewer would be able to hear. So the idea here is to make sure you have crystal clear, studio-level voice recording in your PC. It might sound impossible but it is not very difficult. Here are some tricks you can use to dramatically improve your voice quality:
- Get an external microphone: An external microphone will dramatically improve your voice recording quality, even if it’s a digital microphone or a headset. Most laptops have low-quality in-built mics and they sound very tinny. This degrades your recording quality, and it’s best to have an external mic for this reason. They are dirt cheap, and you will get back your investment by just participating in a single test on Usertesting. But if you really want to take your recording game to the next level, I would suggest that you get a Condenser Microphone.
A condenser microphone is only slightly costlier than a digital mic, but the improvement in voice quality is exceptional. I recommend you get a whole set, that contains a condenser mic, a phantom power supply, and a stand for your microphone. It sounds like overkill, but is actually a pretty good investment. The next thing you know you are starting your own podcast on Spotify or Youtube. - Install AI Noise cancellation: These are AI-powered software which removes all background noise from your surrounding as you speak (LIVE!). It is really an exciting piece of technology, and I recommend you check out the video below to understand how powerful they actually are. This will let you record only your voice, and combined with a condenser mic you can get studio-quality results from the comfort of your home.
There are 2 AI Noise cancellation solutions in the market now. The first one is a freemium software called Krisp. They let you use it for free for up to 120 mins/week. It will actually work if you only use it for Usertesting. DOWNLOAD KRISP FOR YOUR PC/MAC
The second one is a completely free solution by Nvidia, but there’s a catch. You need an Nvidia Graphics Card in your system to run it (GTX or RTX series). The software is called RTX Voice (download link), and even though the company claims that you can only use it with RTX series, it works flawlessly in the GTX series cards as well.
Tips on speaking your thoughts aloud (with clarity)
You might have the best recording quality, but it is of no use if you cannot convey your message properly. The idea here is to most effectively convey your thoughts and feelings to the person who is going to view the test.
- Speak loud and slow. Slow speaking will help the other person easily understand what you are trying to say, and will also increase the clarity of your voice. Try taking slow and deep breaths (before speaking) if you have trouble controlling your pace.
- If you get confused or disturbed due to some reason, you can pause the test. It pauses the recording, allowing you to recollect yourself. Resume recording when you are ready.
- Don’t worry if your English is not good. Your grammar does not matter. What matters is whether you are able to convey your thoughts clearly. Your speech needs to be able to effectively communicate your thought process. Speaking slowly and clearly will help with it.
Follow their guidelines to be a good tester
I have mentioned this before. Your aim in these tests is not to complete the tasks, but to convey your experience and thought process while completing them. This includes speaking out every minute detail or observation you have, dictate the problems you encounter, and even ask questions you get in your mind.
The more verbal you are, the more helpful your test is to the team that receives it. Again, there is no right or wrong way to do the tasks.
What if I still get a bad rating?
Even if you are unable to secure a 5-star rating on your first test, do not lose hope. Usertesting says that it checks the tests of lower-rated testers more frequently. So even if you get a bad rating in your first test, chances are that you will be reviewed again in your next test. So you have another shot at improving your rating.
I was recently demoted to a 4.5 star rating, and get almost the same amount of screeners. So I can guess that a 4.5 star rating is not bad as well.
The only downside is that you will have to work a little harder to get it, as you have fewer screeners available to you.
Update: Usertesting updated their rating system recently. Your rating is now the average of your last 12 tests (that were rated). This way, your rating reflects your latest performance in tests.
Only a small fraction of the tests you give in Usertesting will be rated. But make sure you give your best in each one of them, as you never know who might rate you. If you get a bad rating once, it is very hard to contest them and recover your rating.
how to qualify for more screeners in usertesting (and maximize your earnings)?
To maximize your earnings in Usertesting, you need to attempt as many screeners as possible. You are disqualified from 90% of the screeners you try for (on average). So, the idea is to attempt as many screeners as possible.
The more screeners you get, the better your chances of qualifying. The more screeners you qualify, the more you earn. Simple as that!
Keep the Dashboard tab open most of the time.
This is a no-brainer. The screeners disappear within minutes, so you cannot access them fast enough if you don’t have the tab open in your browser. I usually keep the tab open while I am working on my PC, and since I work throughout the day, I don’t miss any screeners during the daytime (Thanks to the “Ding” sound they make).
Note that the tab might suspend sometimes due to memory issues. So, if you don’t get any screener for an hour or two, try refreshing the tab to activate it again.
You can use the Auto-Refresh extension to refresh the page every 15-20 minutes. This way, you won’t lose out on any screener if the tab suspends due to memory issues.
Some missed screeners can be accessed through email (discontinued)
When you are offline, Usertesting will email you some test opportunities from time to time. You can open these emails, and there will be a link inside that takes you directly to the screener.
I get these emails from time to time, usually in the night. The screeners are accessible for only a limited time using these links. I am able to attempt the screener if I open the link in the mail within an hour or two. So keep a check on the emails you receive from Usertesting.
Update: I don’t get these emails anymore from Usertesting. I think they no longer serve tests through emails.
Fill out the Dashboard Surveys
From time to time, you will encounter a small link on your Dashboard, asking you to fill up a survey to see if you qualify for a series of upcoming tests. Whenever you see such a link, make sure you click on it and fill the subsequent survey. They are a kind of pre-screener, which helps them filter out participants for a series of upcoming tests.

Filling them up can greatly increase the number of opportunities available to you. I once qualified for a 60$ Live Interview with them by filling up such a survey.
It’s hard to know whether the screener you qualified for was the result of a survey you filled up. But it never hurts to try, am I right?
Add more devices and languages in your profile
Several screeners on Usertesting are specific to the type of devices that are added to your profile (mostly Android and iOS smartphones). Add all the different devices you have access to, and install the Usertesting app on all of them.
There are lots of screeners that come specifically for mobile devices. Having access to several of these devices can vastly increase the opportunities available to you.
For example, the screeners that specifically require an Android Tablet stay open for a much longer period of time. This is mostly because not a lot of people own an android tablet, or have not added it to their Usertesting Profile.
The same goes for languages. Adding more languages to your profile might help you qualify for screeners that require a specific language speaker. As a general rule of the thumb, try to fill your Usertesting profile section with as much detail and information as you can.
This advice to add as many devices as possible is common across a wide range of testing websites. If you own an array of devices and would like to earn by testing various apps on them, read this list of CrowdTesting Platforms.
Bonus Tip: Try Krisp to increase your voice quality and rating
Your rating on Usertesting determines the number of screeners you get. To get a better rating, you need to increase your voice recording quality and reduce noise reduction. Krisp can help you with both.
Increasing your voice quality helps you converse with clarity. Try Krisp, an AI-based noise reduction tool that will get you studio-quality voice recording from your regular microphones. It’s free!CLICK HERE TO DOWNLOAD KRISP FOR YOUR PC/MAC
how much can i earn through usertesting?
There is no way to precisely calculate your earning from Usertesting. But on an average, you participate in at least 2 tests per week. That means you can easily earn 80$ every month from Usertesting. I have personally earned 100$ per month on an average, with some good months getting me more than 170$.
Your earnings get a boost if you qualify for their Live Conversation Interviews, which pay 30$ and 60$ (for 30-minute and 60-minute interviews, respectively). They are similar to your regular tests, except for the fact that you are interacting live with the reviewer over a Zoom call. I have qualified for 3 such interviews over the 5 months I have been using Usertesting.
There are people on several forums that claim to have earned up to 300-500$ a month on Usertesting, but they belong to the more developed side of the world. Still, averaging 100-150$ is pretty much possible if you try to keep the tab open and attempt as many screeners as possible.
If you get the hang of it, you can have a constant stream of 10$ payments in your Paypal account. Look at how my Gmail looks like nowadays:
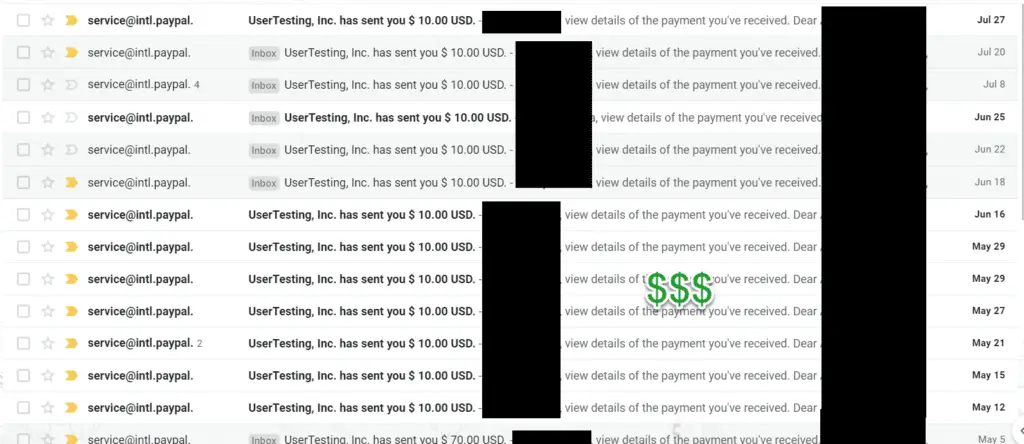
And they are super-fast with their payments as well. You get the payment for your test within 2 weeks of completing it (usually much lesser).
final thoughts on usertesting
There are a lot of platforms like Usertesting that have emerged. They all follow the same process (screening, testing, 10$ payments). I have tried several such platforms such as Usercrowd, Userlytics, Userfeel, Validately, Google User Research, etc. But so far, I have only found Usertesting to have the maximum amount of work available.
The sites mentioned above are all legit, and there are lots of payment proofs from them floating online. But in my personal experience, I was not even able to get a single screener for them. But Usertesting seems to be at the top of the Tester Sourcing Platforms for now.


Am willing to be an app tester
Then go ahead and signup on Usertesting
Hey Buddy!
Does this website provides work to Indian users? As I’ve seen majority of such websites give more preference to Europian and American users.
Hi Bro,
This website is mostly geared towards jobs that work worldwide, including India. Most of these websites accept Indians without any problem.